
One of the most convenient ways for guests to share their Salsa captures is through email. This is an easy and accessible sharing method for both you and your client. Better still? You’re also able to collect guest emails for marketing purposes! 📧
Quick Start
How to Set up Email Sharing Walkthrough Video
In this video, you will learn:
What email sharing is
How to turn email sharing on or off
How to change the settings for email sharing
How to customize the look of the email
How to turn on social media sharing from the email
How to enter your company information into the email
How to
Turn On Email Sharing

To turn on Email Sharing for your event:
Log in to the Salsa web app
Select an existing event or create a new event
Click Configure Event
Click the Sharing tab
Click Email on the left hand navigation
Toggle Email Sharing on
What to Know
Basic Email Sharing Settings
Email sharing is customizable and similar to the settings we offer for our live galleries. Here are a few basic settings that are important to know:
Sender’s Name: This is the name that shows your recipients who the email is from. Most booth owners put their company’s name here.
Subject Line: Pretty self explanatory, but what you’d like to have appear in the subject line. We like “Honk if You Love Your Photos!”, but you do you.
Reply-to Address: While this is optional, we definitely recommend adding your company’s email address here. This way, if someone were to respond to an email, it would send directly to you. This is a great way for interested guests to reach out to you for booking their upcoming events!
Custom Send Address: By default, email shares will come from email@boothmailer.com. If you’d like to show your email address instead, you will need to set up your domain.
Please note that this is a more advanced feature and requires some knowledge of domains and how to change their settings. You can find out how to set up your domain here.
What To Know
Lead Section
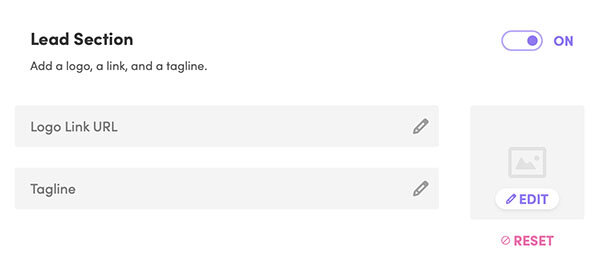
The Lead Section is the top section of the email message which displays the event name, a tagline, as well as a logo which can be made into a clickable link.
Logo: Add a JPG or PNG file to be displayed at the top of the email
Event Name: Displays the name of the event at the top of the email. The event name can be changed from Event Info settings.
Logo Link URL: Allows guests to be directed to a specific website when they click the logo.
Tagline: Add a tagline, or short message, below the logo and name of the event. If a tagline is not included, the number of captures will be shown instead.
What to Know
Social Sharing

In the Social Sharing section you’re able to choose which social media platforms you’d like to show for guests within the email.
Additionally, you can add either a Default Sharing Caption for all platforms or create specific captions for each platform. These captions will be added along with the link that guests share.
What to Know
Customizations

The Customizations section allows you to add a headline and message within the email, as well as create a Call to Action (CTA) button. This button is prominently displayed at the top of the email.
The CTA button is a great opportunity to drive guests to another website, whether it’s your site to book an event, the venue’s upcoming events calendar, or a donation page for a charity event.
Headline: Write the title for the email message
Body: Write the message within the email
Button URL: Enter in the website address that you would like to direct your guests to when clicked
Note: The website address needs to start with https:// in order for it to be accepted
Button Label: Enter the text that will show up on the button
Button Color: The color of the button is set by the email’s accent color under the Design settings
What to Know
Company Info

The Company Info section allows for you to provide your company’s website, phone number, and social media links.
This information is displayed at the bottom of the email.
Headline: Enter in your company or business name
Email: Enter in a contact email address
Website URL: Enter in your company’s web address
Phone Number: Your company’s phone number.
Facebook: Enter a link to your company’s Facebook page.
Twitter: Enter a link to your company’s Twitter page.
Instagram: Enter a link to your company’s Instagram page.
Terms and Conditions URL: A link to your company’s Terms and Conditions page.
Privacy Policy URL: A link to your company’s Privacy Policy.
Tips and Tricks
All web address/links need to include the https:// or http:// in order for it to be accepted.
Adding hyphens (-) to the phone number can improve readability
If your company does not already have a terms and conditions page, you can use TermsFeed to generate and host a terms and conditions agreement.
FAQs
Will This Work Without WiFi or an Internet Connection?
In order for the captures to send via email, you’re going to need an internet connection. If you don’t have an internet connection at your event, the captures will send when your Salsa connects to the internet again.
Where Can I See the Email Addresses of Guests From the Event?
You’ll be able to export a list that includes the email addresses of guests. You can find out how to download that list in this article here.