
How To Set Up The DNP DS620A For Wired Printing
Learn how to get your Guac set up for printing using the included DNP DS620A.
Table Of Contents
Before You Start
Quick Start Video
Printer Assembly
Set Up Wired Printing
What To Know
Before You Start
Required Parts
Required parts to assemble the printer:
DNP DS620A
Printer media
Printer AC power cable
Printer USB cable
Quick Start
Set Up Wired Printing Walkthrough
In this video, you’ll learn:
What’s included with the printer and media boxes
How to connect printer to USB and power
How to load paper and ink media into the printer
Step One
Unpack And Power On The Printer
Open the larger box labeled DP-DS620 (A).
Remove the paper catch tray, printer power and USB cable, and all other accessories.
Carefully lift the DS620A printer from the box and place it on a table clean of any items or debris.
Plug the square side of the printer USB cable into the back of the printer.
Plug the power cable into the back of the printer.
Plug the other end of the power cable into a wall outlet.
Turn the printer on by flipping the switch on the front of the printer.
Step Two
Unpack The Printer Media
Open the smaller box labeled Media Set DS620(4x6).
Remove one roll of printer paper and one roll of ink.
Carefully open the ink ribbon packaging.
Step Three
Load Printer Media Into The Printer
Open the printer by lifting up on the bar found at the bottom front of the printer and pulling the printer tray forward.
Remove the ink ribbon tray from inside the printer and set it on a flat surface.
Take the ink ribbon and insert it into the ink ribbon tray by aligning the spools into the proper slots.
Note: Make sure that the ink ribbon is running along the top of the ink ribbon tray.
Press the blue lever found on the side of the printer and lift to reveal the scraps tray and paper spool.
Remove the scraps tray by lifting it up.
Remove the paper spool and separate the two sides by gently pulling them apart.
Take the printer paper and insert each half of the paper spool into either end of the printer paper.
Load the printer paper with the paper feeding down and remove any stickers on the paper.
Roll the printer spool down until you hear a beep.
Reinsert the scraps tray into the front of the printer.
Close the printer door and push the printer back in until you hear it lock into place.
Attach the paper catch try onto the front of the printer.
IMPORTANT: Always remove printer media before transporting your printer. Removing the media and loading it into the printer when you arrive at the venue will ensure both your printer and media are ready to create beautiful prints.
Step One
Assemble Guac And Connect The Printer
Assemble the base plate, poles, and Guac head
Note: Make sure to run the printer cable up through the poles along with the AC power cable for Guac.
Optional: You do not need to attach the flash and umbrella at this time, as these two components are not required to set up printing. However, you will want to attach them before an event for the best capture quality.
2. Plug the printer cable and AC power cable into the printer
3. Connect Guac to power and turn it on
4. Connect the printer to power and turn it on
Step Two
Configure Ethernet Settings

Open the Settings app on the iPad
Tap Ethernet in the left navigation
Tap Configure IP
Select Manual
Tap IP Address
Enter in 172.16.0.7
Tap Subnet Mask
Enter in 255.255.255.0
Step Three
Set Up Printing In Your Event
Open the Fiesta iOS App
Select an event or create a new event
Tap Configure Event
Tap the Sharing tab
Toggle on Printing
Toggle on Use Chips as Default Printer
Note: If the printer cannot be found, make sure Guac is plugged in, powered on, and that settings are correct. View the troubleshooting steps.
8. Adjust other printer settings as needed
Step Four
Adjust Print Media Size
By default, the printer is set up to print 4x6 images. If your event includes a 2x6 photo template, you will need to adjust the print media size.
Open the Fiesta iOS App
Tap the Account icon in the upper right
Tap Hardware Dashboard
Tap Chips Dashboard
Tap Adjust Printer Media Size under Printer Settings
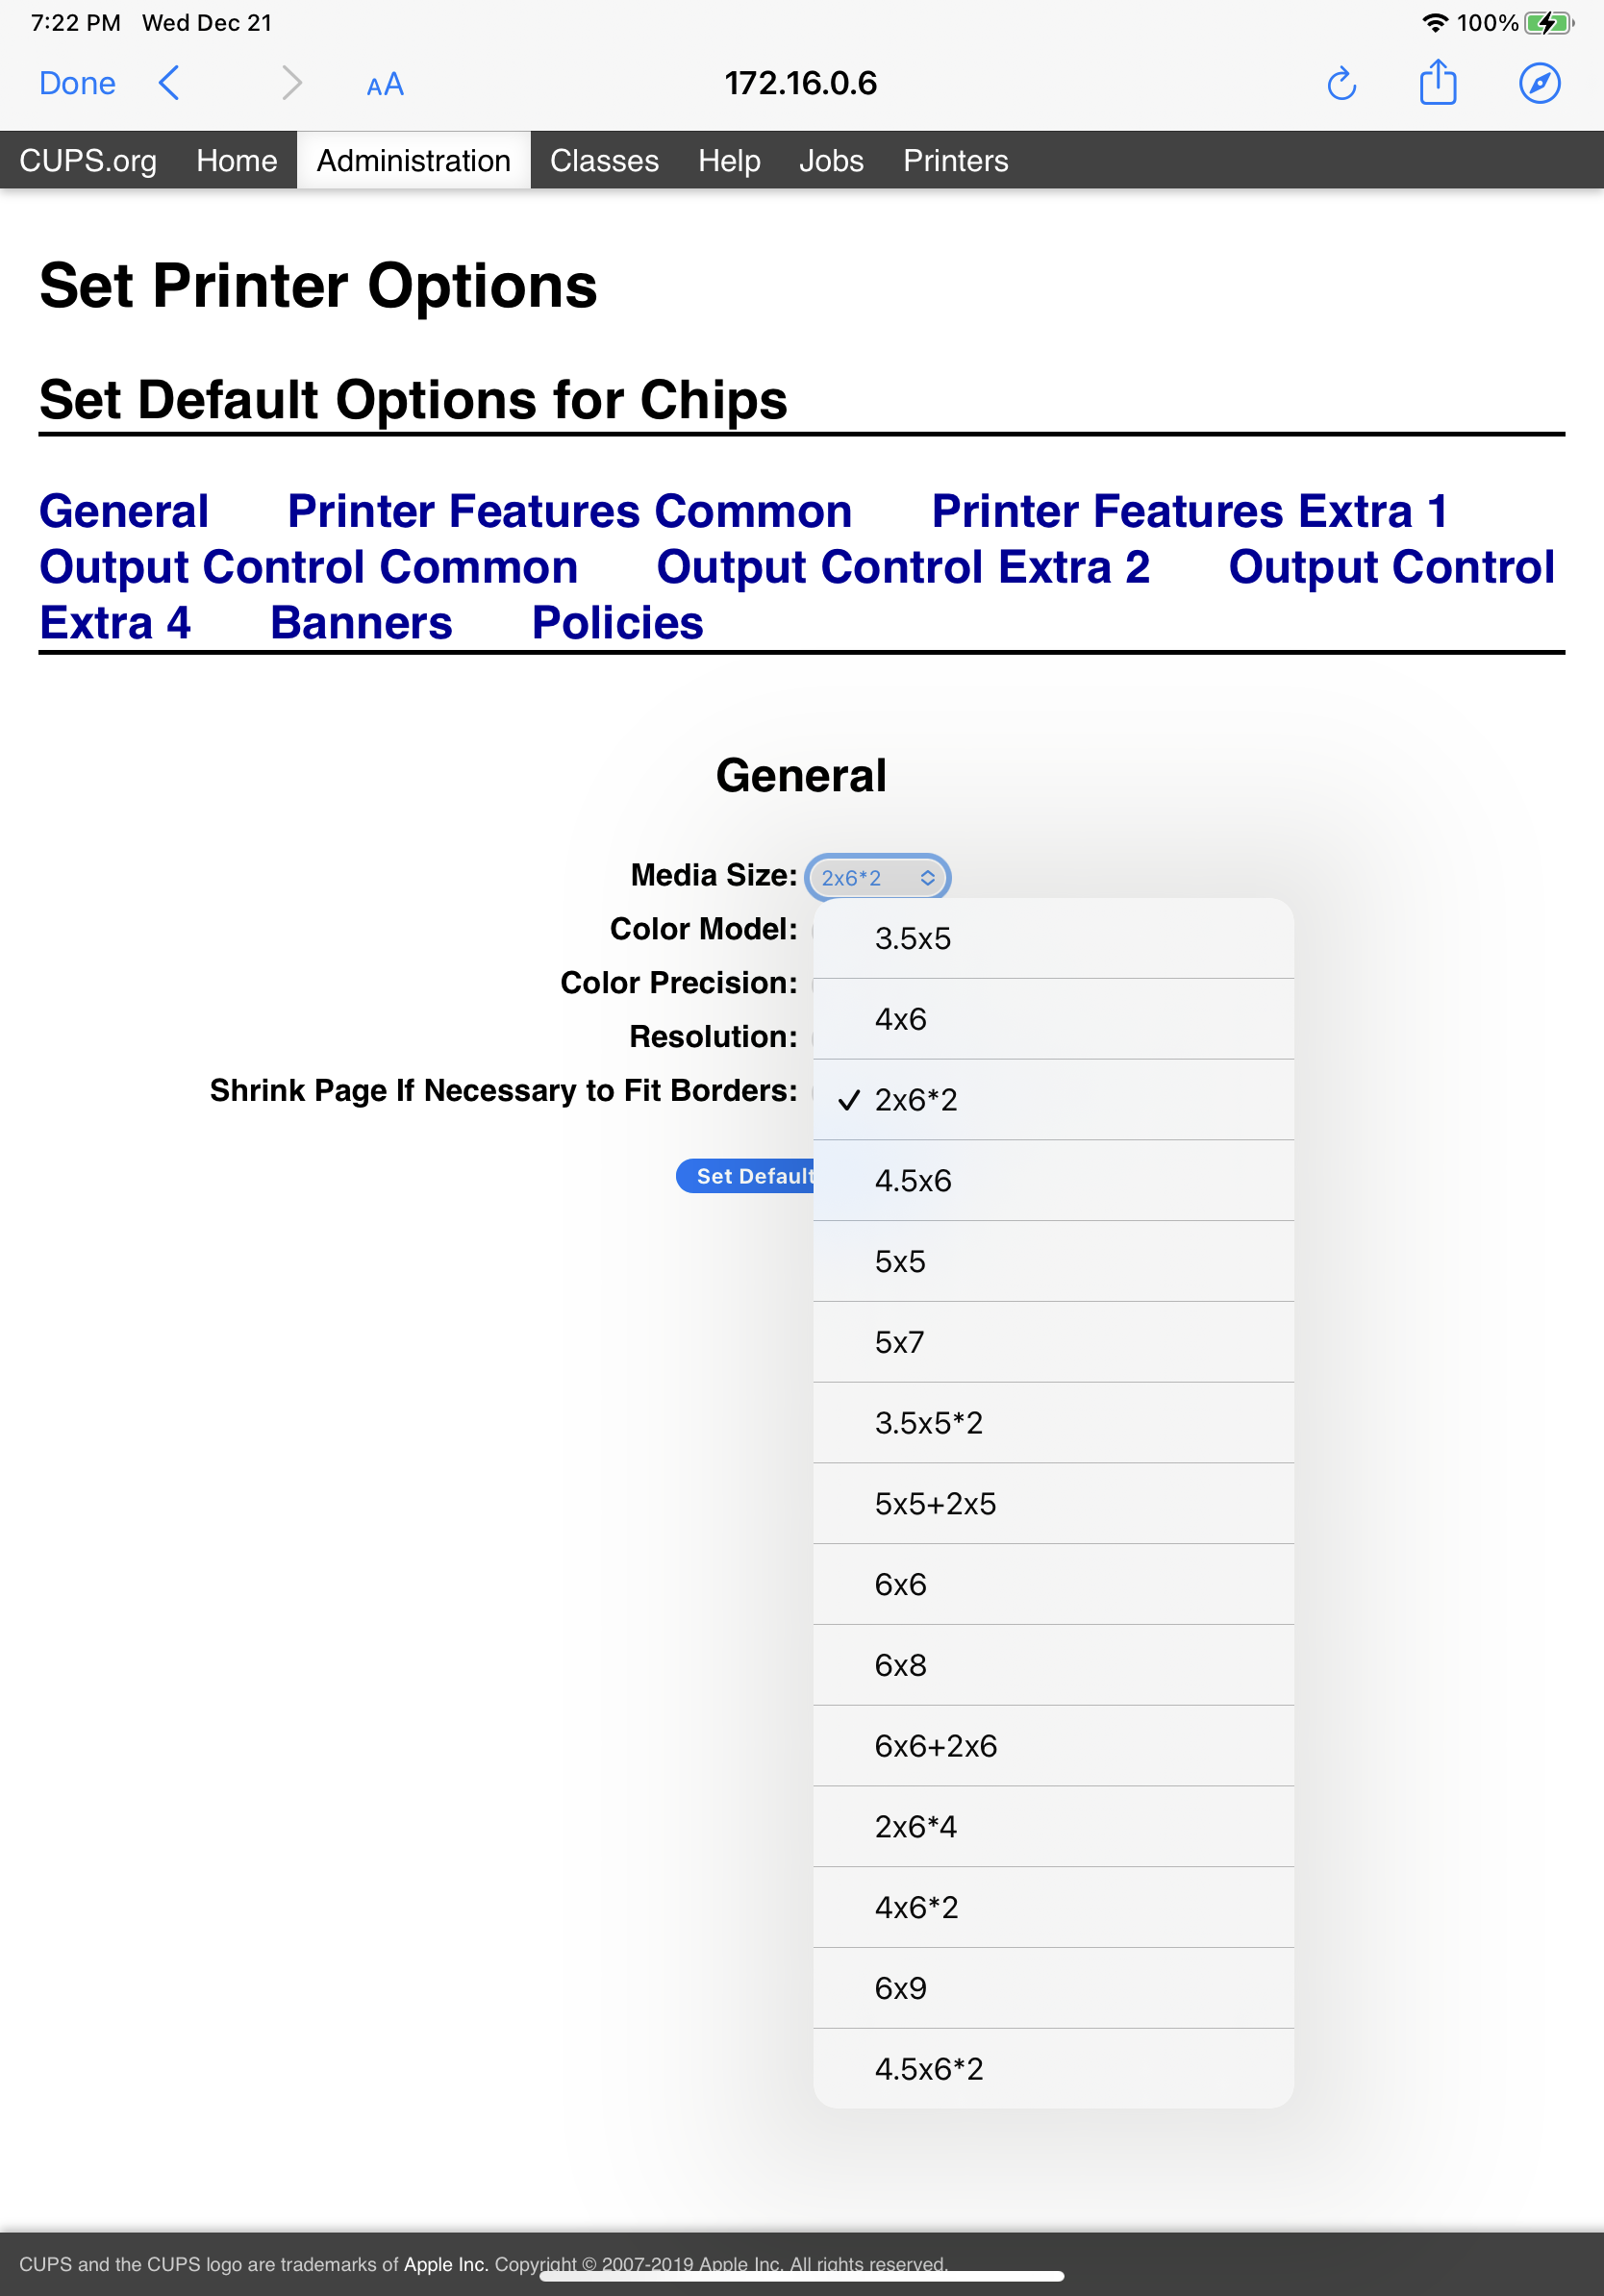
Tap the Administration dropdown menu
Select Set Default Options
Tap the Media Size dropdown menu
Select 2x6*2 for 2x6 photo templates
Tap Modify Defaults
Tap Done in the top left corner to return to the Fiesta iOS App
Note: You may be required to enter in a username and password to access the Administration menu.
Username: printer
Password: password
What To Know
Printing 2x6 Photo Templates
The printer is set up to print 4x6 images and photo templates by default. In order to print different sizes, the media size will need to be adjusted within the printer’s settings.
You can change the print media size by following these steps.
To print 2x6 photo templates:
Set the print media size to 2x6*2
Set the photo template to Double 2x6 in Fiesta
Note: The DNP DS620A does not support printing single 2x6 photo templates.
The 2x6*2 setting allows the printer to print two copies of the photo template on one 4x6 piece of paper and cuts it in half to create two copies.
What To Know
Advanced Printer Settings

The Advanced Printer Settings (APS) provide greater control over how Salsa prints photos and photo templates.
APS controls two aspects of the print out:
Scale: the size of the image printed
Offset: the alignment of the image printed
These settings can be adjusted if the size of the image on the print out or alignment are not coming out as expected.
The technical training and demonstration video includes:
What the Advanced Printer Settings are
What and how to use Scale
What and how to use Offset
Important: The APS do not affect digital shares and only changes how the images are printed.
What To Know
Printing Copies After An Event
To print copies after an event:
Open the Fiesta iOS App
Select the event you want to print from
Select Configure Event
Tap Modes
Tap Sharing Station to turn it on
Tap Start Event
Select Start Sharing Station
Select a capture
Tap Print
IMPORTANT: Captures may not print correctly if printed from outside of a running event or Sharing Station.
What To Know
Difference Between Wired And Wireless Printing
Guac supports both wired and wireless printing.
Wired printing provides a faster and more consistent experience over wireless printing.
Wireless printing, on the other hand, benefits from greater convenience. You can place the printer farther away from the booth without having to worry about connecting cables between the two.
Wireless printing may require additional hardware, such as an AirPrint dongle.
What To Know
Printing In Extreme Temperatures

The Chips printer, like other photo printers, relies on dry heat to transfer color onto the rolls of paper inside the printer. If it is not able to heat up properly, or if there is excessive moisture, the printer can easily become jammed. Here are a few things you can try to prevent these issues:
When the printer has been in extreme cold, allow the printer and media to warm up to room temperature before trying to use
Keep the printer out of direct sunlight, especially on hot days, to prevent excess ink transfer
Avoid using in extremely humid areas. When unavoidable, keep a fan on the printer